3 Simple Steps to Get Started
Step 1 : Insert the Churn Solution JS Embed Code
The following code will add the Churn Solution client-side script and make itself available in the global JS namespace as window.churnsolution. You can use it to start the off boarding process for your customers. Just add it to the <body> section of your HTML.
<script>
    !function(){
        if (!window.churnsolution || !window.churnsolution.ready) {
            window.churnsolution = { ready: true };
            const s = document.createElement('script');
            s.src = 'https://app.churnsolution.com/sdk/index.min.js';
            s.async = true;
            const e = document.getElementsByTagName('script')[0];
            e.parentNode.insertBefore(s, e);
        }
    }();
</script>
Or you add it to the <head> section of your HTML as:
<script src="https://app.churnsolution.com/sdk/index.min.js"></script>
Step 2: Server-side authentication
Server-side authentication is implemented to ensure that all requests sent by Churn Solution to your payment provider on your behalf are valid and authorized. You can do it by generating an HMAC hash (SHA256 algorithm) with the API_KEY and your STRIPE_SUBSCRIPTION_ID key.
Replace "STRIPE_SUBSCRIPTION_ID" with your actual Stripe subscription ID.
Before starting the Churn Solution flow, you should send a request to your server. This request will validate its permission usually through existing authorization measures for user actions. The hash generated by this code should be sent to front end to be used in the next step.
Below are some examples of how this hash can be generated in different backend languages.
private static String getSha256HmacHash(String API_KEY, String STRIPE_SUBSCRIPTION_ID) throws NoSuchAlgorithmException, InvalidKeyException {
    Mac sha256HMAC = Mac.getInstance("HmacSHA256");
    SecretKeySpec secretKeySpec = new SecretKeySpec(secretKey.getBytes(), "HmacSHA256");
    sha256HMAC.init(secretKeySpec);

    byte[] hash = (sha256HMAC.doFinal(STRIPE_SUBSCRIPTION_ID.getBytes()));
    StringBuffer result = new StringBuffer();
    for (byte b : hash) {
       result.append(String.format("%02x", b));
    }
    return result.toString();
}
Step 3: Link your cancel button to Churn Solution flows:
Once you've created an HMAC hash and sent it to your website's front end, you can set up Churn Solution and decide how you want it to appear. Typically, you will attach an event listener to you’re "cancel" button.
Adding the authHash is simple, follow the instructions in the Server Side Authentication section above to create an HMAC hash and pass it to the authkey parameter. The below code calls a function in Churn Solution side that accepts the authkey generated by the back end, the Stripe subscription id and the company App Id.
document.getElementById('cancel-button').addEventListener('click', function () {
    window.churnSolution?.run(
    authKey, // hash generated by the back end
    stripeSubscriptionId, // Stripe Subscription Id
    'APP_ID', // your App Id
    {
        // options
        "cancellationSettings": {
            "settings": {
                "CANCEL_TIME": {
                    "cancellation_time_type": "CUSTOM_DATE", // can be: "END_OF_BILLING_PERIOD", "IMMEDIATE"
                    "cancel_after_days": 0
                }
            }
        }
        record: true,
        email: '',
    }
)});
Configuration Options
Add Custom Fonts
By default, Churn Solution uses the font selected on the design page. However, you can override this with any font you prefer for your cancellation flow. To do this, you need to pass two parameters to the sessions API: font and fontUrl.
Here’s an example of how to specify the font:
document.getElementById('cancel-button').addEventListener('click', function () {
    window.churnSolution?.run(
    authKey, // hash generated by the back end
    stripeSubscriptionId, // Stripe Subscription Id
    'APP_ID', // your App Id
    {
        // options
        record: true,
        email: '',
        font: 'Roboto', // Font example
        fontUrl: 'https://fonts.googleapis.com/css2?family=Roboto:wght@400;500;700&display=swap', // Font URL example
    }
)});
Enable/Disable Session Recording
Session recording is enabled by default. You have the option to disable session recording by setting the record parameter to false in the options of Step 3: Link your cancel button to Churn Solution flows from the installing section.
Set Cancellation Term
Learn how Churn Solution manages the cancellation of your customers' subscriptions. By default, each flow follows the option saved on the configuration page.
- Immediate: Choose this option for instant subscription cancellation. The customer's subscription will be terminated immediately upon cancelling his subscription.
- EndOfBillingPeriod: Select this option to handle cancellations at the end of the current billing period. This allows customers to access services until the end of their paid subscription duration.
- Custom: Opt for this option for personalized cancellation processes. If chosen, specify a Cancellation Delay in terms of the number of days to define the precise termination timeline.
Please Note: While each flow typically follow the configuration page settings, you have the flexibility to override this default behavior for any customer. Simply set the Cancellation Term option to either "Immediate," "EndOfBillingPeriod," or "Custom" in Step 3: Link your cancel button to Churn Solution flows from the installation section.

Subscription Renewal Configuration
This feature allows you to win back customers who have cancelled their subscription, with the cancellation setting after a specified date or at the end of the billing period (cancellation has not happened yet). You can configure and display a call-to-action (CTA) to let your customers renew their subscription using these settings from the configuration page
- Immediate Renewal: Once the user clicks on the renew CTA, their subscription is cancelled directly.
- Renew with Customer Confirmation: The user has the option to set a headline, message, and CTA text for the pop-up that will be shown when the user clicks on the renew CTA.
- Renew with Special Offer: Here you have the option to add a headline, message, CTA text, and offer users with a stripe coupon that will be applied to their first payment.
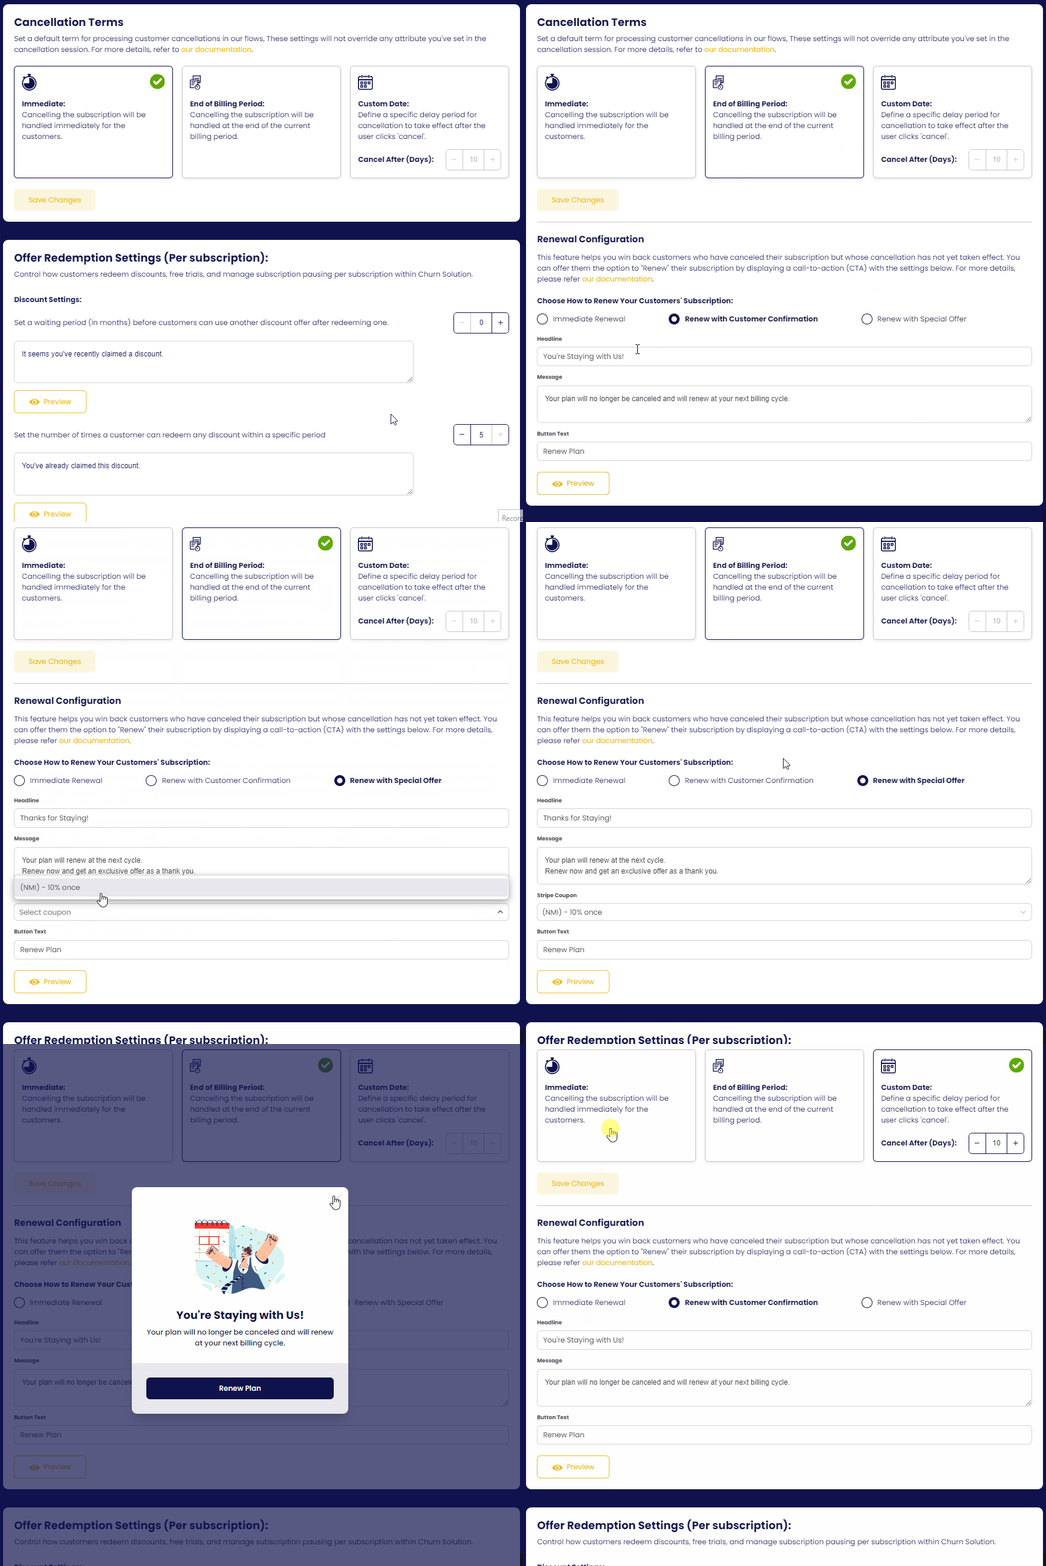
Once you've determined the desired configuration, you need to implement the renewal functionality on your site. Typically, you will attach an event listener to your Renew Plan button. The following code calls a function in Churn Solution side that handles the renewal process:
document.getElementById('renew-button').addEventListener('click', function () {
    window.churnSolution?.renew(
    authKey, // hash generated by the back end
    stripeSubscriptionId, // Stripe Subscription Id
    'APP_ID', // your App Id
    {
        // options
        record: true,
        email: '',
    }
)});
Resume Configuration
This feature enables you to offer your customers the option to resume their subscription after they have paused payment collection. You can configure and display a call-to-action (CTA) to let your customers resume their subscription using these settings from the configuration page
- Immediate Resume: Once the user clicks on the resume CTA, their subscription will be resumed directly.
- Resume with Customer Confirmation: You will have the option to set a headline, message, and CTA text for the pop-up that will be shown when the user clicks on the resume CTA.
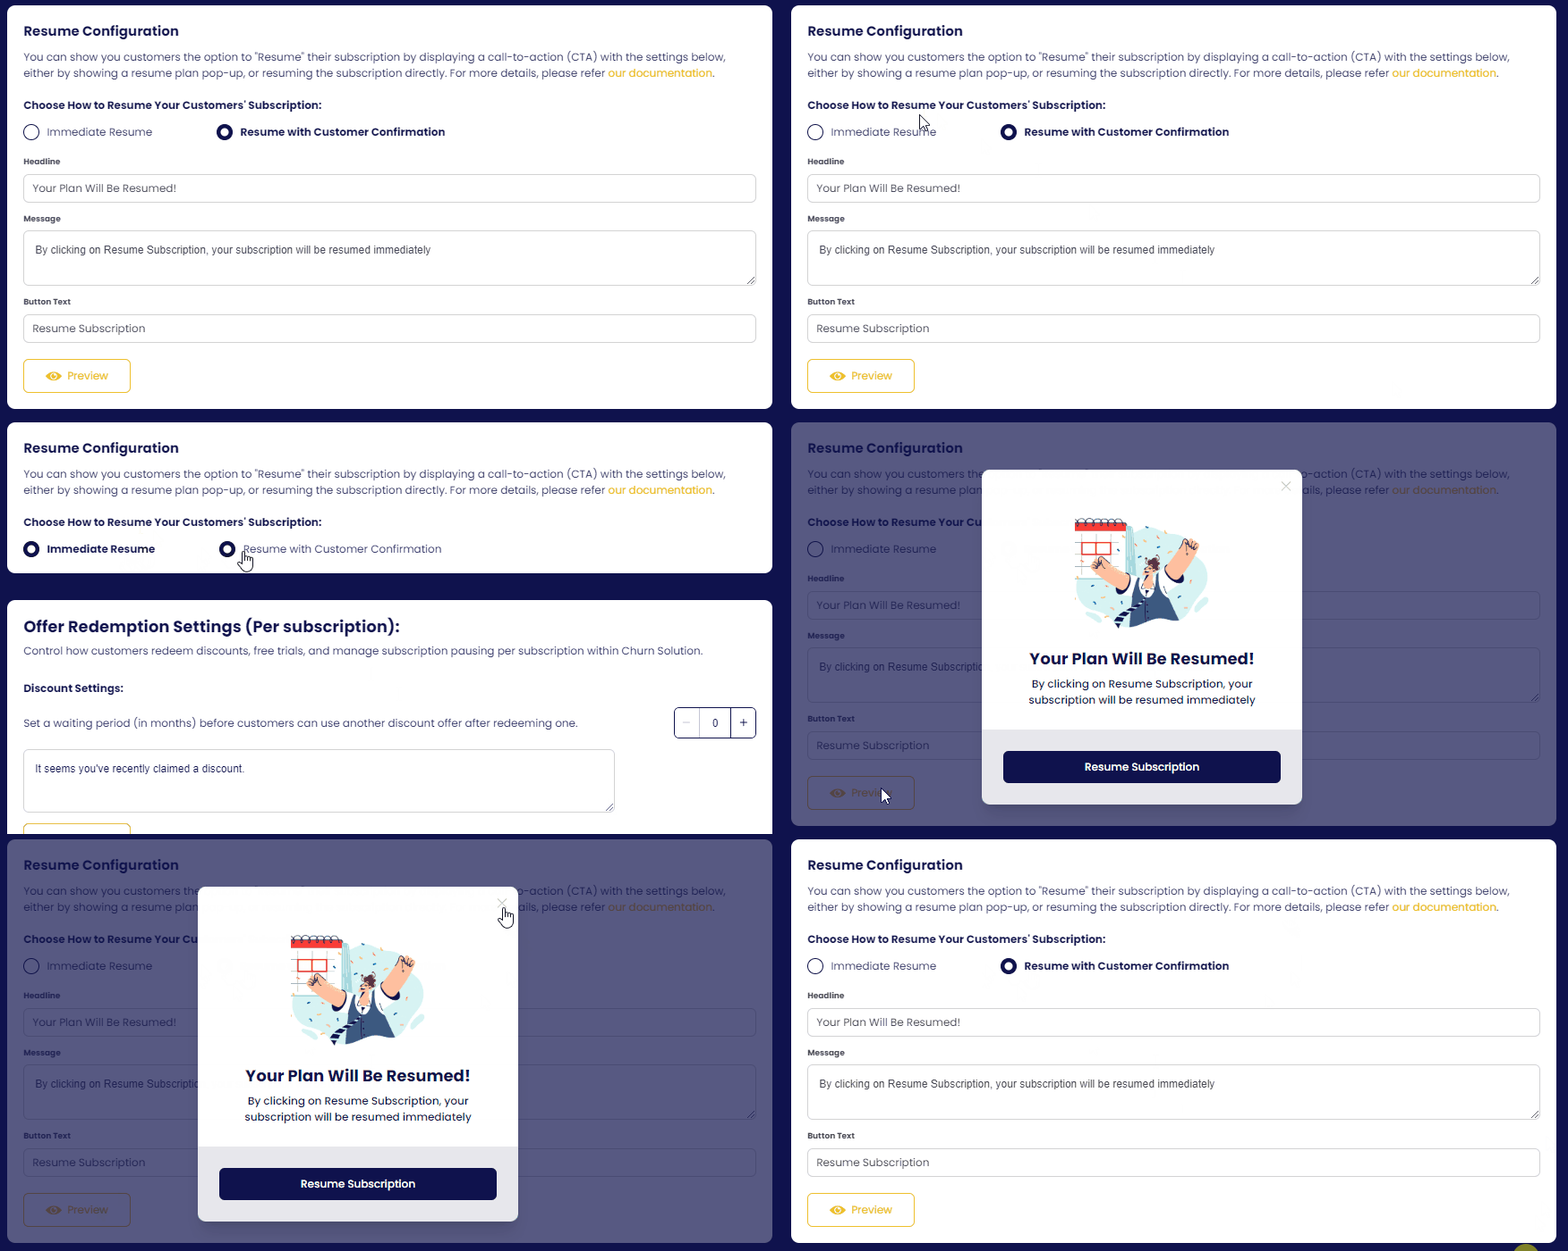
Once you've determined the desired configuration, you need to implement the resume functionality on your site. Typically, you will attach an event listener to your Resume Plan button. The following code calls a function in Churn Solution side that handles the resume process:
document.getElementById('resume-button').addEventListener('click', function () {
    window.churnSolution?.resume(
    authKey, // hash generated by the back end
    stripeSubscriptionId, // Stripe Subscription Id
    'APP_ID', // your App Id
    {
        // options
        record: true,
        email: '',
    }
)});
Custom Attributes
When configuring the cancel flow, you can define custom attributes to effectively segment your customers. Here's how to proceed:
- Within the Configuration Settings tab or directly from the cancellation flow in the Audience page, create a custom attribute. For instance, you might create an attribute like Has_Extended_Free_Trial to segment users based on whether they've already extended their free trial.
- Use this custom attribute to apply flows for the specified segments within your cancel flow. For example, you could target customers who have use free trial and have already extended it.
- When invoking window.churnSolution.run(), ensure that you include Has_Extended_Free_Trial under customerAttributes.
document.getElementById('cancel-button').addEventListener('click', function () {
    window.churnSolution?.run(
    authKey, // hash generated by the back end
    stripeSubscriptionId, // Stripe Subscription Id
    'APP_ID', // your App Id
    {
        // options
        customerAttributes: {
            Has_Extended_Free_Trial: false // or true, based on user's status
        },
        record: true,
        email: '',
    }
)});
Customer Segmentation based on Metadata
Suppose you already have a metadata field either from the customer metadata or subscription metadata and it's set for all your customers.
In the Configuration Settings tab or directly from the cancellation flow in the Audience page, establish a new custom attribute. Specify the fields used in your metadata and their respective data types.
Employ this custom attribute to define segments within your cancel flow, similar to the previous example.
Now, when a customer interacts with the Embed, we'll first prioritize the value of the entered key field, if provided during session creation. Subsequently, we'll search for the relevant data in both their customer and subscription metadata. If found, we'll use that value from the subscription metadata first, then from the customer metadata, to evaluate your segment conditions.
Custom Callbacks
Handler callbacks are used when you want to manage actions to a customer's subscription by yourself, rather than letting Churn Solution do it automatically for you. When you define a handler callback for a specific event, like a subscription cancellation, Churn Solution will follow your instructions instead of doing its implementation for it.
Most of these handler callbacks work like promises in JavaScript. When something happens, you have two options: resolve or reject. If everything goes well and you want Churn Solution to proceed as planned, you call resolve. You can even include a message to let the customer know what's happening. On the other hand, if there's an issue and you want Churn Solution to stop and handle it differently, you call reject.
This object will contain the actions handlers with a flag for each action to specify whether the action handler is a replacement to Churn Solution handler or an extra functionality. If any of the below props is true its action will be handled from Churn Solution side and if you have callback for this event it will be called also when executing the action events from our side. Furthermore, you have the option to send the customer email who started the cancellation flow.
{
    record: true, // default true, switch to false to turn off recording
    email: '', // User email that initiates the cancel flow
    handleCancel: (customer, flowInfo) => {
        // cancel callback
    }, handleAbandon: (customer, flowInfo) => {
        // close callback
    }, handlePause: ({pausePeriod}, customer, flowInfo) => {
        // pause callback
    }, handleTrialExtension: ({trialExtensionDays}, customer, flowInfo) => {
        // trial extension callback
    }, handleCoupon: ({code}, customer, flowInfo) => {
        // coupon/discount callback
    },
    // If any of the below props is true
    // its action will be handled from Churn Solution side
    autoCancel: false,
    autoPause: false,
    autoSwitchPlan: false,
    autoTrialExtension: false,
    autoCoupon: false
}
Example callbacks for custom cancel handling
If you want to customize and use your cancel logic rather than using Stripes Cancelling Mechanism, you can define handleCancel option and set the autoCancel to false, similarly you can do it to all other actions. This callback is triggered when a customer selects to cancel his subscription. If you've defined this callback, Churn Solution won't automatically attempt to manage this actions through Stripe. Instead, it will execute the logic you've specified within the respective callback.
window.churnSolution.run(
    'HASH', // hash generated by the back end
    'STRIPE_SUBSCRIPTION_ID', // Stripe Subscription Id
    'APP_ID',
    {
        handleCancel: (customer, flowInfo) => {
            return new Promise(async (resolve, reject) => {
            try {
                // handle cancel logic

                // You can pass a message that will be showed to user after cancelling
                // if you don't pass a message, a generic message will be shown
                resolve({ message: 'Your account has been canceled. You will not be billed again' });
            } catch (e) {
                console.log(e);
                reject({ message: 'Failed to cancel account. Please contact support.' });
            }
        });
        }, handlePause: async ({pausePeriod}, customer, flowInfo) => {
            return new Promise(async (resolve, reject) => {
            try {
                // handle pause logic

                // You can pass a message that will be showed to user after cancelling
                // if you don't pass a message, a generic message will be shown
                resolve({ message: `Your account has been paused ${pausePeriod} month${pausePeriod === 1 ? '' : 's'}. You will not be billed until resume` });
            } catch (e) {
                console.log(e);
                reject({ message: 'Failed to cancel account. Please contact support.' });
            }
        });
        },
        // If any of the below props is true
        // its action will be handled from Churn Solution side
        autoCancel: false,
        autoPause: false,

)
Integrating Google Form into Cancellation Confirmation
In the cancellation confirmation process, you have the option to include a Google Form for your customers. This form can be set as either required or optional.
Steps to Add Google Form:
- Make the Form Public: Ensure that your Google Form is public, allowing customers to access it without restrictions.
-
Enable the Google Form in Confirmation step:
- In the cancellation confirmation settings, enable the option to show the Google Form button in the confirmation modal.
- Customize the button text that will appear to your customers and specify the link it will redirect to.
If you want customers to submit the form before proceeding with the cancellation, enable the option to require Google Form submission so that your customers will be blocked from cancelling the subscription until they submit the form.
you have to follow these steps:
-
Adding a Unique Field to the Google Form:
Create a new field titled "Cancellation Bin Code" as a Short Answer field in your Google Form. This field will be pre-filled with a unique value at runtime to validate form submissions.
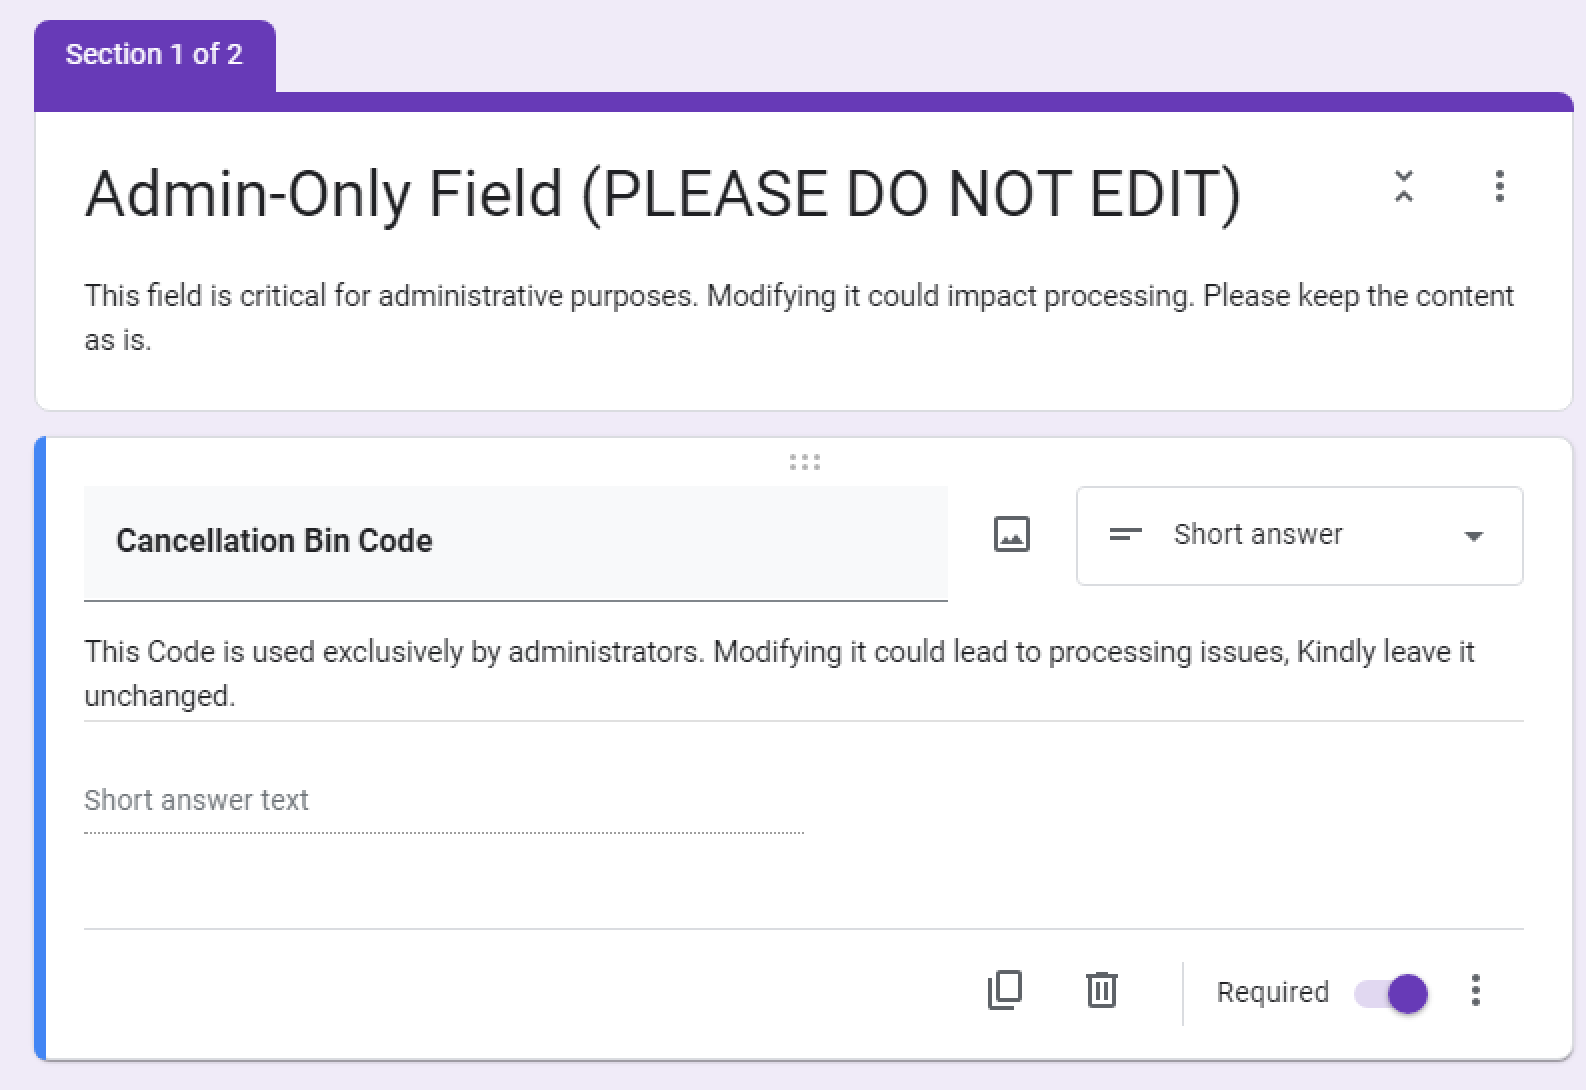
- Google Form Script Setup:
-
Access Script Editor:
- In the Google Form builder, click on the three dots in the upper right corner and select Script editor.
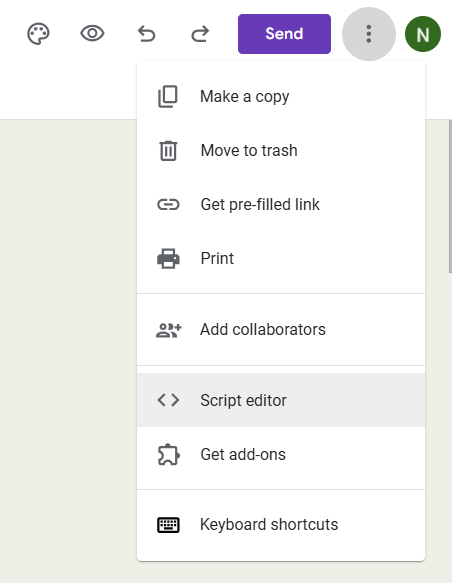
-
Add the Script:
- Copy and paste the following code into the script editor

function onFormSubmit(e) { const CANCELLATION_BIN_CODE_FIELD = "Cancellation Bin Code"; const API_URL = 'https://google-form.churnsolution.com/submit'; // Extract item responses const itemResponses = e.response.getItemResponses(); // Extract the value of the "Cancellation Bin Code" field const cancellationBinCode = itemResponses .find(item => item.getItem().getTitle() === CANCELLATION_BIN_CODE_FIELD) ?.getResponse(); // Validate the cancellationBinCode if (!cancellationBinCode) { Logger.log('Error: Cancellation Bin Code is empty. Aborting API call.'); return; } // Define API request options const options = { method: 'post', contentType: 'application/json', payload: JSON.stringify({ cancellationBinCode }) }; // Send the HTTP request try { UrlFetchApp.fetch(API_URL, options); } catch (error) { // Catch and log errors during the HTTP request Logger.log('Error during API request: ' + error.message); } } -
Save the Script: After pasting the code, save the script.
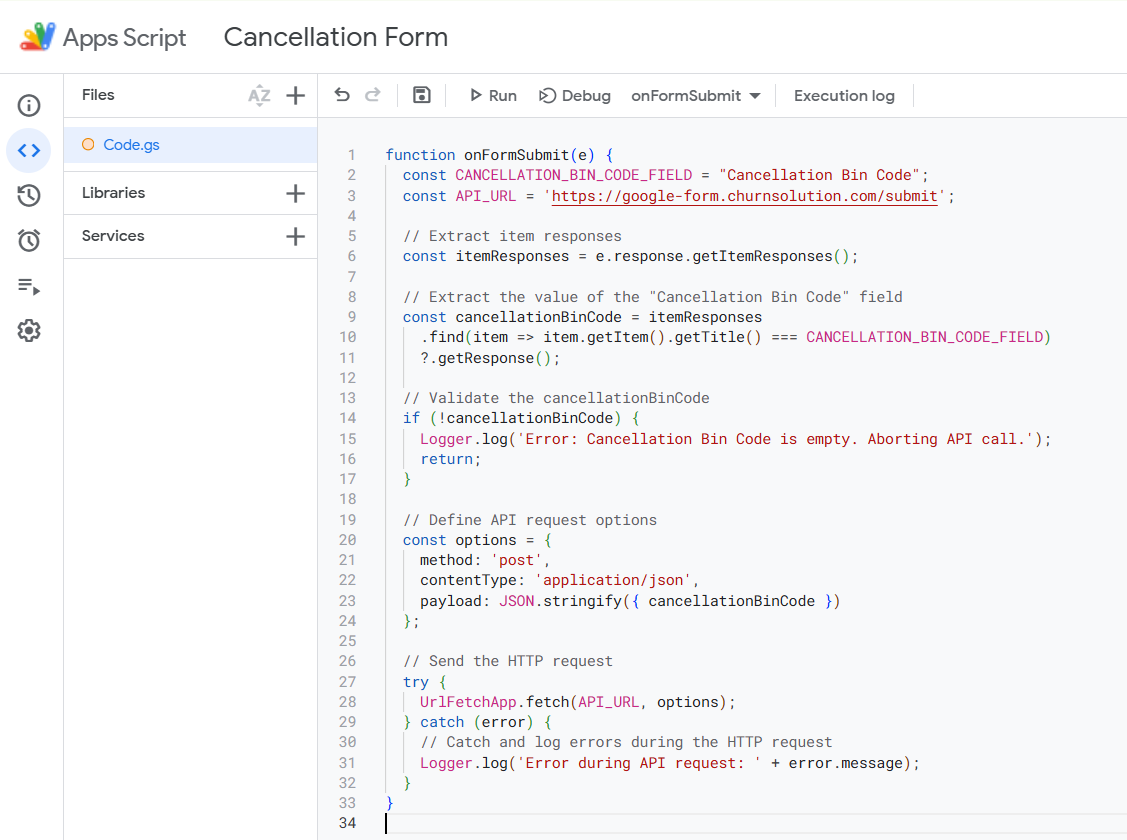
-
Set Up Triggers:
- From the same page, click on triggers, add new trigger, and match these settings.
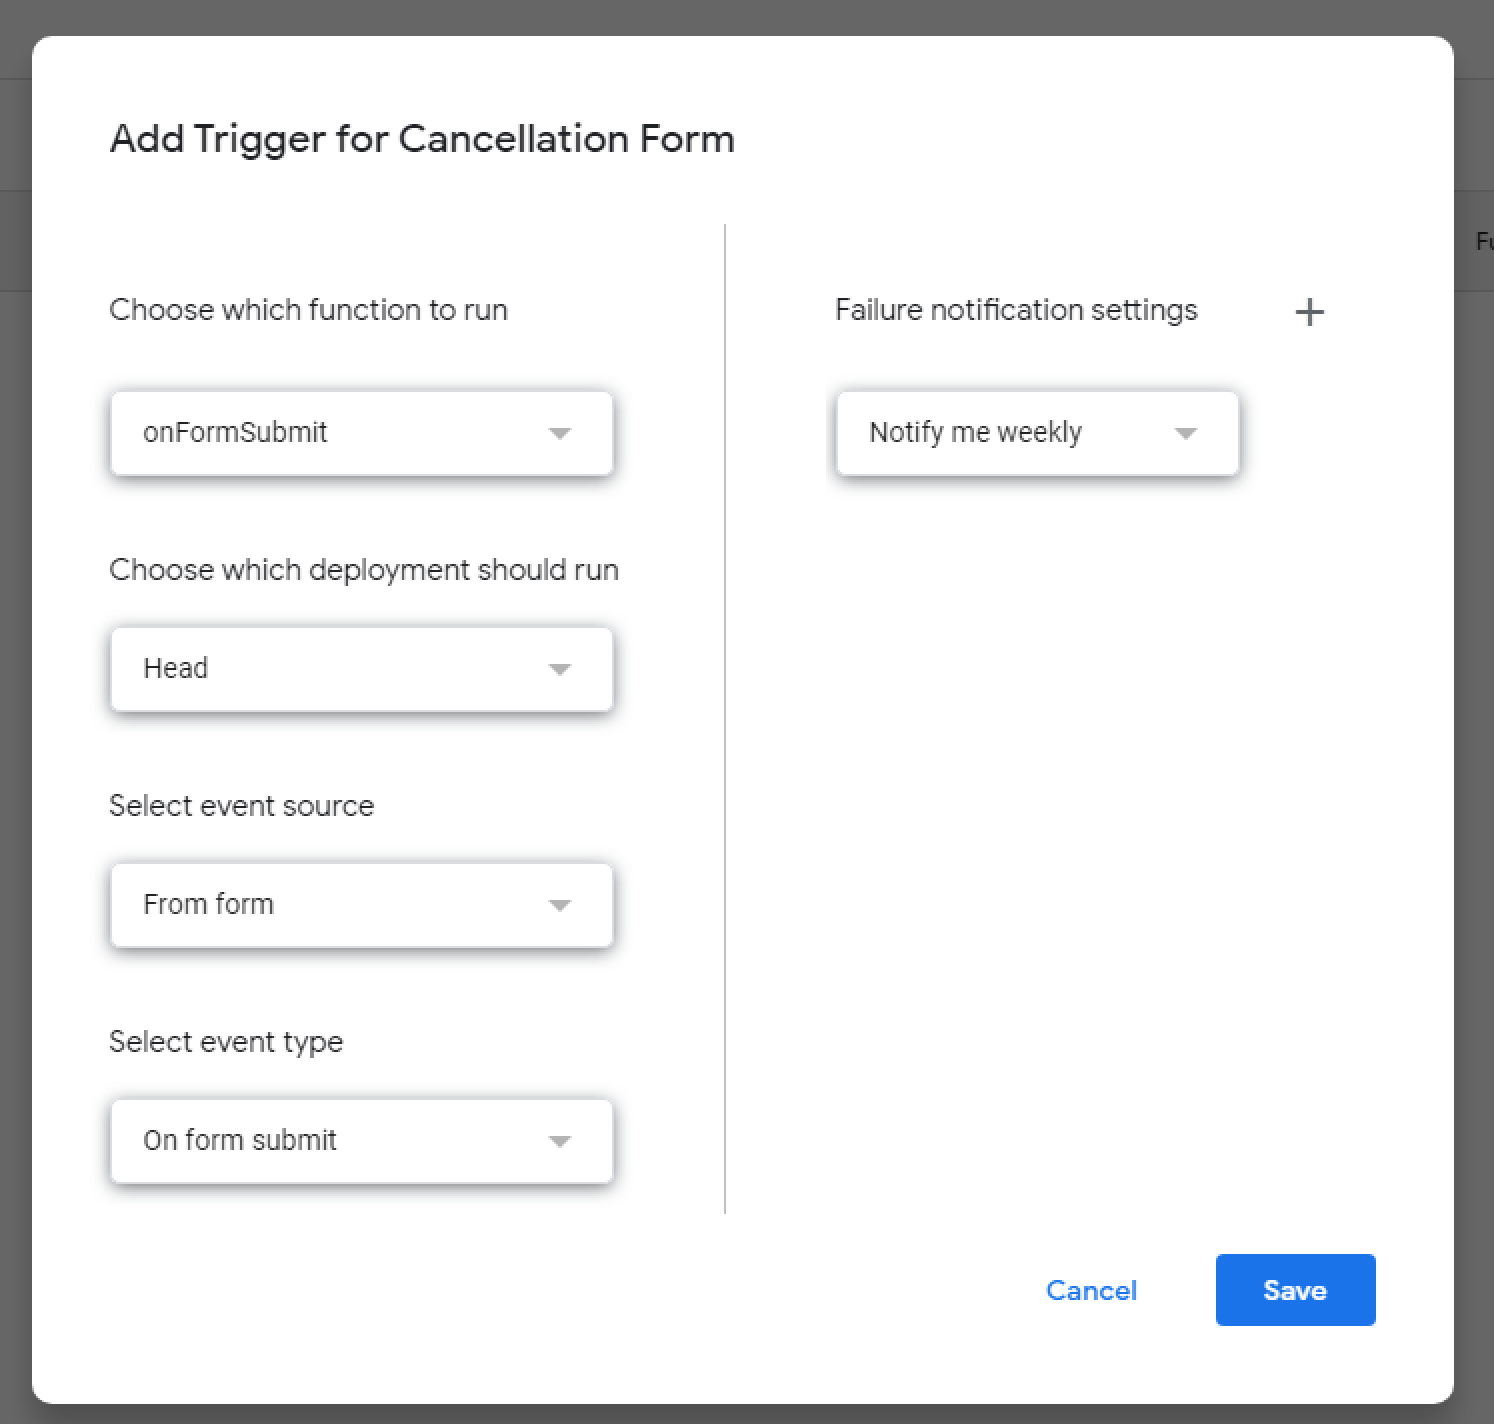
-
After setting it up, save the trigger to ensure it appears on the triggers page.

-
In the settings page, you can add a message for customers after they submit the form. Navigate to
Form settings -> Presentation -> After submission -> Confirmation message, and edit the
message to inform customers not to close the form. For example: "Your response has been recorded!
Please keep this form open until we process your cancellation. We'll close it automatically when
done. Thank you!"
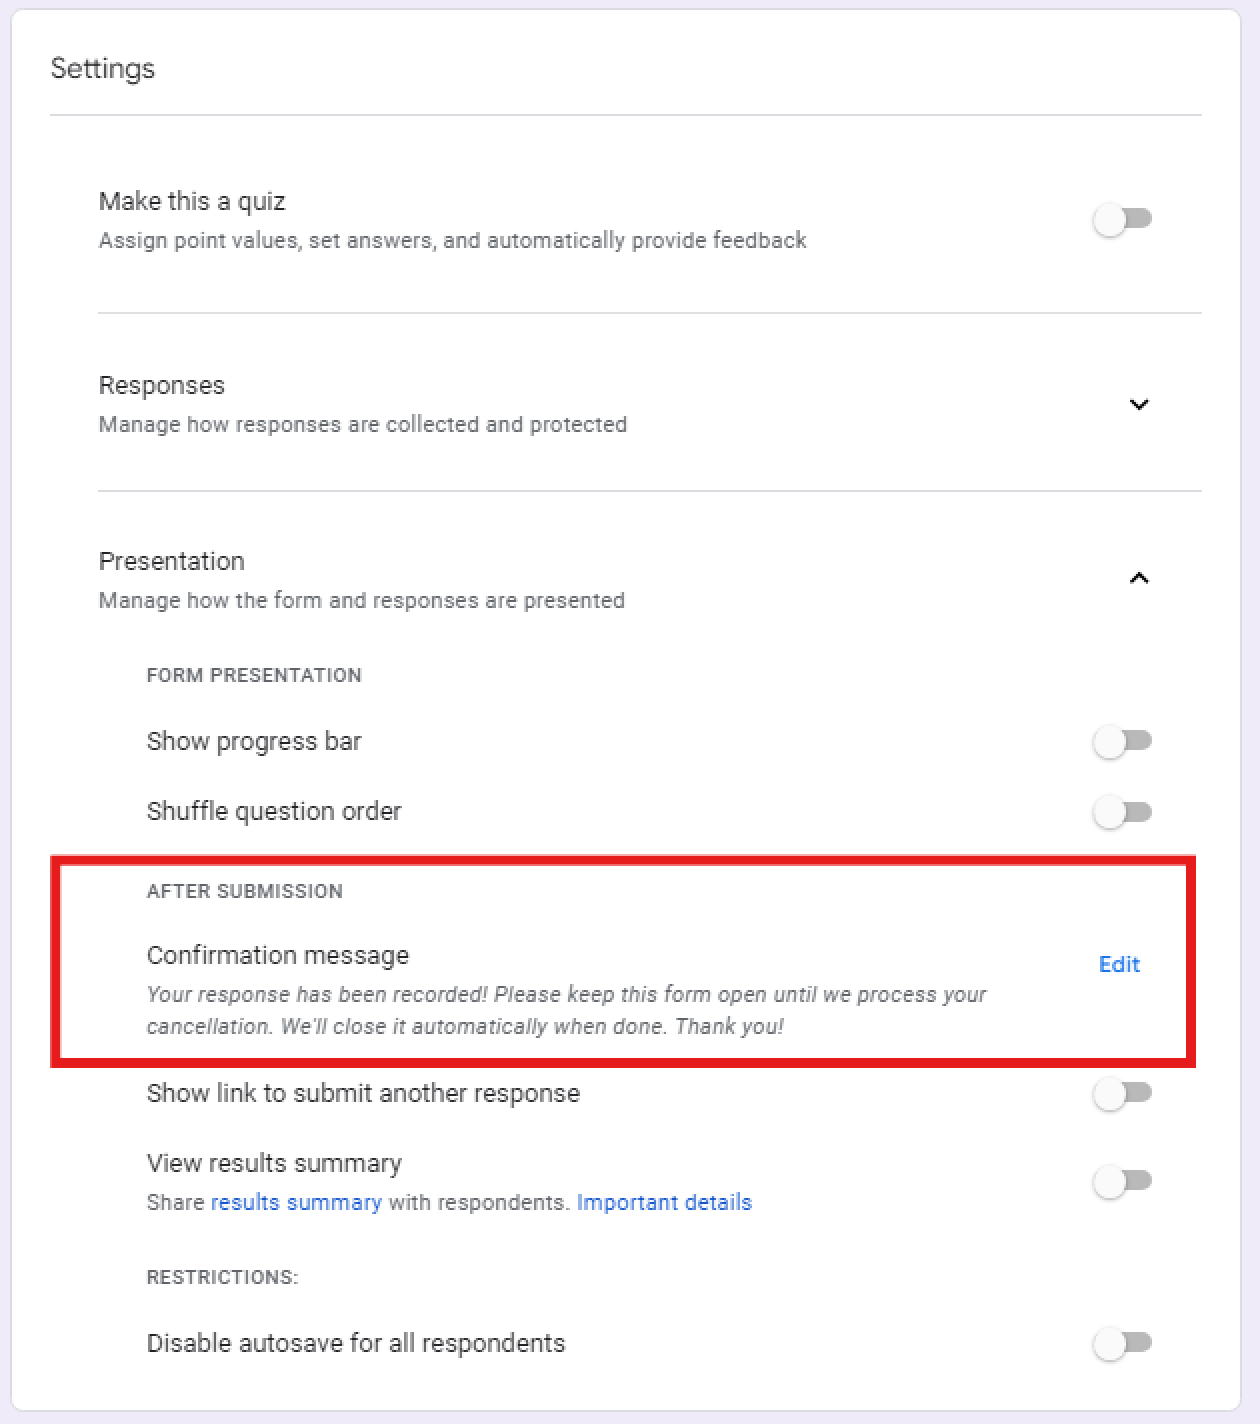
Now you can easily integrate this Google Form into your cancellation flow.
On This Page


